


We are often asked how to check the accuracy of your schema markup after implementation. When you add schema markup to your website, it can be difficult to quickly determine if the markup is accurate and will help you click through more with rates and rich results. Fortunately, there are many tools available to help with
Is my schema markup successfully deployed?
The first step is to make sure your markup is on the page. If you're copying and pasting JSON-LD into a page, you can easily right-click on the webpage, view the source and search for "LD + JSON" in the Elements tab to see if the code exists. Yes or no If you're using the Schema app or Google Tag Manager to define your code, it's easy to use Google's Structured Data Testing Tool (SDTT) to determine if markup exists. ۔ (Read for instructions on how to use SDTT.)Alternatively, you can wait and check inside the Google Search Console to learn about the good results or features associated with some search data. It depends on how many days Google crawls your site regularly.
For websites that dynamically populate schema markup, e.g. When using JavaScript, only Google's Structured Data Testing Tool will show these results. Dynamic schema markup requires testing tools to load HTML and process JavaScript, which Google has been cooperating with for years. If you create a schema markup using inline HTML (such as microdata, RDFA) or a JSON-LD server side has been developed, all tools should work.
Is there an error in this process?
It is very important that you check your schema markup so that you can be sure that it is working hard behind the scenes of your website! While you wait for the Google Search Console results to appear, there are many tools that allow you to check for any errors or warnings that may cause your markup.Structured Data Testing Tool (SDTT)
Google's Structured Data Testing Tool is a great and fast tool. When you input your URL and click "Run Test", it will show all your schema markup in an easy-to-read format in the field on the right side of the screen. Additionally, you can click on any organization you detect and show you the same JSON-LD in the field on the left side of the screen. It will also show any errors and warnings in your markup so that you can make adjustments as needed. Please refer to our SDTT Error Guide to learn about errors and how to fix them.There are some things about SDTT that are worth calling. First, the tool often caches versions of your page. This means that if you are actively making changes to your markup, the latest markup cannot be checked. To overcome this, simply click on the new test, and insert your JSON-LD or micro data directly into the tool.
In addition to caching, the SDTT schema makes serious mistakes on institutions when they are not really appropriate. It is possible that your markup was done correctly, but SDTT does not have the business rules to understand it.
Rich result test
Using the Rich Results Test, you can test the schema markup you have added to see if it can yield good results. It is important to note that not all full results or error types are supported. Google always expands the list of full types of results it supports, and you can refer to their documentation to verify this.
Schema app structured data tester
The Schema app's structured data tester can be found in the "Tools" tab of the schema app. This tool allows you to place in the URL of any website and will display the schema markup found on this page. It is the only testing tool in the world that displays dynamic schema Arg numbers and does not catch results. Integrating a testing tool within the Schema app improves your schema markup workflow so you don't always have to go to another site to test your markup.
It is recommended to get in the habit of using at least one of these tools when doing your website markup with the Schema app. Not only will this confirm whether your markup is positioned correctly, but it will also give you a glimpse into the scope of your markup, giving you an idea of its accuracy. Will be able to
Click here to learn more about the latest tools of the Schema app to easily add schema markup to your website.
Google Search Console
During 2018 and 2019, Google unveiled a new search console. As a result, many of the new features were introduced, and the old features changed. We will now discuss how to navigate these changes and then provide you with a description of how to dive into the available data.
New features
One of the most important changes to the new approach is the Structured Data Report, which is now implemented in the Enrichment and Performance section. Although, over time, the graph is no longer visible to show all the structured data on the site, but the enrichment includes rich results or features associated with certain structured data.
This addition shows any errors or warnings related to the schema markup that are reporting the full results, as well as an accurate example of the markup. While this is usually the source of what you see on Google pages, our team has discovered some inaccuracies in these additions to our clients' properties. If you're looking at them, check out our quick tip blog post "How to Fix Errors in the New Google Search Console" for a full walk.
getting started
When you first log in to Search Console, it will open with a review page, as shown below.
To view search engine results page (SERP) statistics, click Open Report. (You can also access this information by selecting Performance from the left sidebar.)
Organic Traffic Ltd You will now be presented with the performance of the site. This includes clicks, total impressions, average click-through rate, as well as average position. The default layout will display the data for the last three months. You can click on any squares to turn them on and toggle the graph. For a clean result, we recommend just starting with total clicks and total impressions.
Capture your starting point
If you're just starting to implement your schema markup, we recommend benchmarking current site performance trends.
The Google Search Console provides a 16-month window of the matrix, meaning that there is always an overlap of three months with the previous year. This data can be used to measure progress over the years. You now have a window of opportunities to record data so that you can move a large reference frame forward. Below we will show you how to adopt this outline, in addition to other debt filters you can apply.
Slicing and dyeing data
Google Search Console has a number of options for displaying data. For specific date range, page sets, or certain types of questions.
Date filter
This filter allows us to cut off the time we want to search. To view the entire month of data, click on the 'History' filter and select the last day of the month from the last day of the month.
Once this chart is fixed the filters will look like the following.
Repeat this process for each month to get a snapshot of a particular month's performance.
Time comparison
Google Search Console provides some descriptive comparison period. They can be found under the Compare tab in the date range selection tool. To get the biggest amount of the year in terms of year figures, compare the last three months of the year to the year.
Be aware of trends that occur on specific days (such as increasing site traffic on Saturdays or Sundays). For the best opportunities, you can manually select the comparison period (start and end dates) to align with the same day of the week (such as Saturday or Monday). Simply move the start and end dates of the previous year to just one day, as shown below, to calculate and calculate the year of the year.
Page set - Structured data vs. no structured data
Important! Inventory your page sets, especially note the schema markup and when it was added. The 'Page' filter in Google Search Console allows you to filter URLs that meet or do not meet certain criteria. This can be found by clicking on the "+ New" button next to the date filter and selecting the "Page 1" option.
Measure by page type
You can measure the effects of schema markup on a particular page type. The Schema app plugin and the Schema app highlighter automatically apply the same schema markup to a specific URL pattern, allowing you to specifically measure the performance of the sample pages. For example, if I want to measure 'blog posting', I can use the 'page' filter to only add pages that have '/ blog /' in their URL. This will allow us to see the performance of these pages in particular.
Capture the effects of good results
If a page is eligible for full results, just use the 'Search Appearance' filter to show pages with good results.
If the pages didn't get good results before, you probably did. There will be an increase of more than zero. Pages with good results can be compared to other pages to see the effect.
Unbranded questions
When we improve the pages, we want to influence search performance, not only for your brand specific, but also for your service, products or other important content you create. Schema markup provides search engines with valuable context on what your content is about, what is important and why, and which content works best. This obviously translates to increased performance because search engines can better find your content with the user's search intent. This may increase:
- non-branded impressions
- clicks
- click-through rate
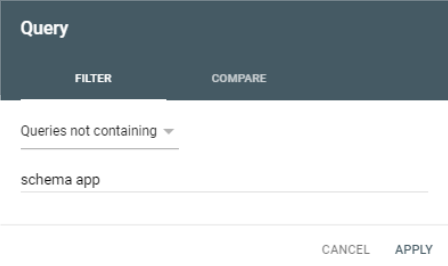
The Query filter allows you to filter out queries containing or not containing any given keyword, thereby differentiating branded versus non-branded content. Think carefully when determining which queries would be branded versus non-branded. In our case, we could filter to match only queries not containing “Schema”, however this might omit valid non-branded queries that are about schema markup and not Schema App specifically. Therefore, filtering out “Schema App” would likely be the best approach to see only non-branded site performance.
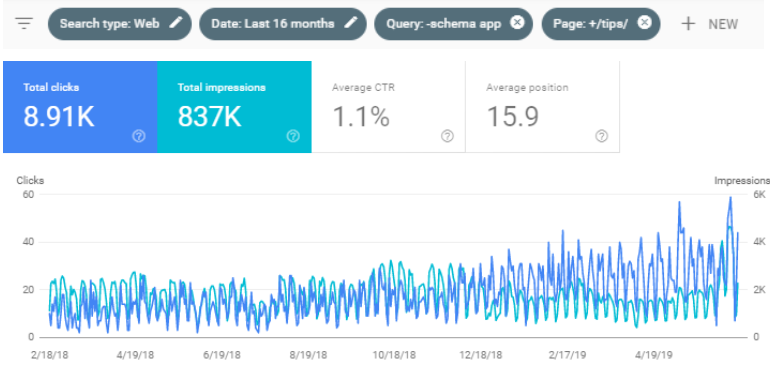
Blog posts are often key drivers of traffic around your content area topics, and these are more often found via non-branded queries when compared to other site pages. To capture the metrics on this, you can combine a Query filter and a Page type filter to see how the non-branded traffic has changed over time, as shown below.
The Big Picture
We’ve now covered how to segment the data in Google Search Console in the way that best applies to your site’s scenario, potentially using a combination of the date filter, page filter, rich result filter and query filter. Using the methods we’ve outlined, you can capture results that can be benchmarked to the overall site’s performance.
For example, compare the ‘rich results’ click-through rates to the click-through rate of the site as a whole. If the rich results have a higher click-through rate, you’ll know that they are outperforming the other pages and skewing the sitewide click-through rate up.
Let’s take a closer look using a rich results filter. Since rich results are directly correlated with schema markup, we can remove the rich result filter and see how this compares to occasions when the rich result is not served for the page.
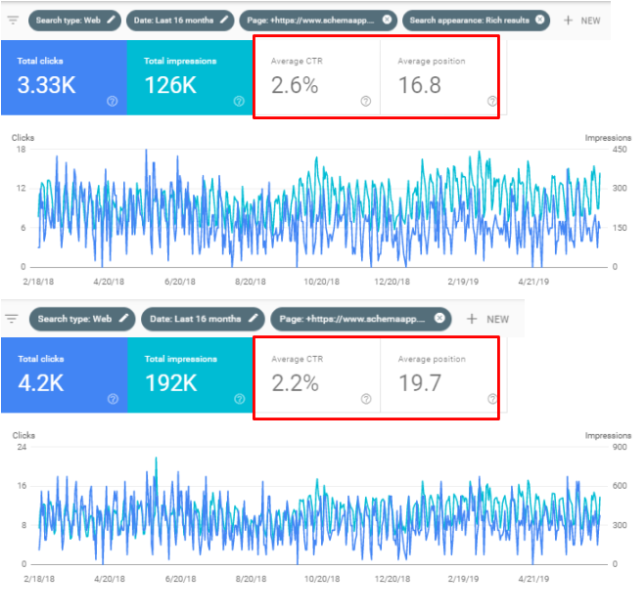
Comparing the two charts, we can see the rich results have a higher click-through rate and achieve a better average position at 16.8, which would mean the rich results and by extension the structured data is skewing the sitewide performance up.
Next Steps
Now that we have created at least one segment, we can now create any number of segments and compare these against others to gather interesting data points. The following list provides some ideas for how you can stretch the Search Console filters to gather new metrics.
- Calculate the percent of impressions or clicks that your rich result segment are achieving compared to the sitewide performance.
- Calculate the change in growth rate by determining the difference between the average growth month-over-month before and after schema markup. Optimally this would use the same number of months before and after for an accurate representation of this change.
- Calculate the growth of rich results as a percentage of total growth by determining the difference between two time periods for both rich results and sitewide and then calculating the rich results difference as a percentage of the sitewide difference.
We understand there is a bit of a learning curve with measuring the impact of structured data within Google Search Console. If you have any questions on this, or have any questions around your site in particular, please reach out and we would be happy to provide guidance.


1 Comments
Paisykamana.blogspot.com
ReplyDeleteMany tips online make money or others